List view
New Releases
New Releases
Getting Started
Getting Started
Order Management
Order Management
Inspection Management
Inspection Management
Templates
Templates
Introduction
Fingertip: The Digital QA/QC app enables users to initiate inspections offline. With this option, users download their inspection data first and then proceed to the factory floor for inspection without any concerns. The Fingertip app ensures that all data is securely saved on the device. When users are ready to submit their inspection, the app uploads and stores the data on our server while generating the inspection report, ready to be reviewed.
Before you start your inspection
Start the Mobile App
In Fingertip, the Inspector user can start conducting their first inspection with our Fingertip QA/QC App by following the steps below.
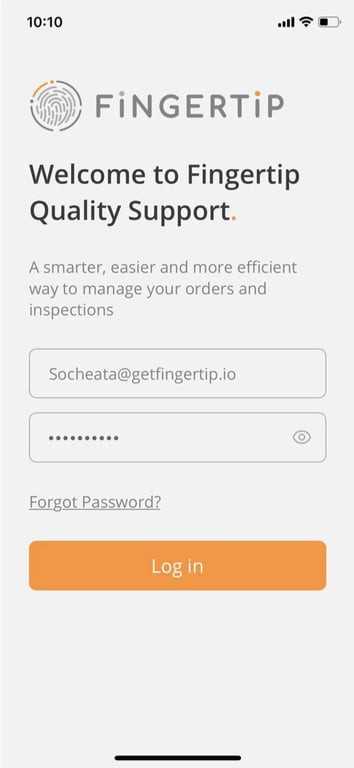
After opening the Fingertip: QA/QC app, users will land on the login page.
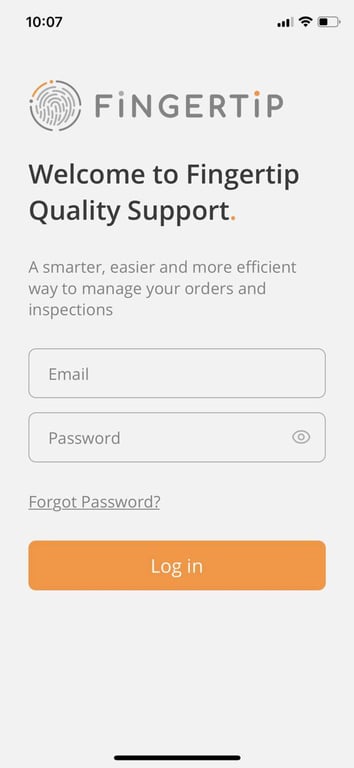
Please input your email and password to log in.
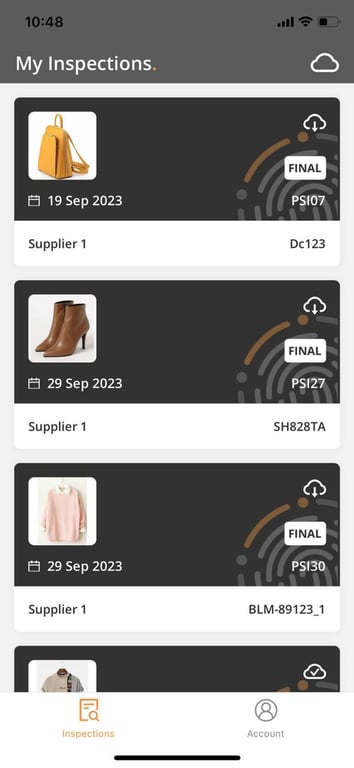
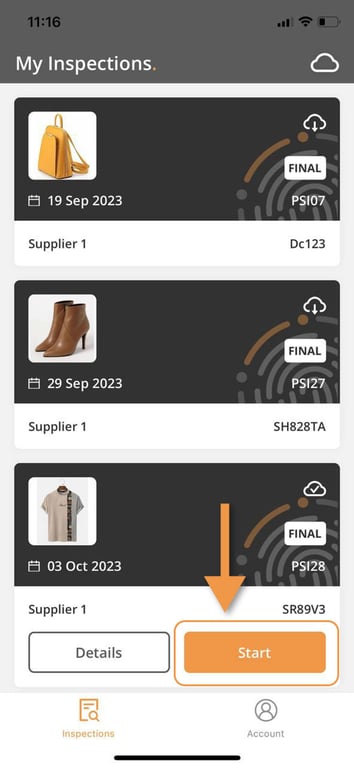
After login to the App, the user will be taken to the inspection landing page.
On the Inspection landing page, the user will only be able to see the inspection assigned to them.
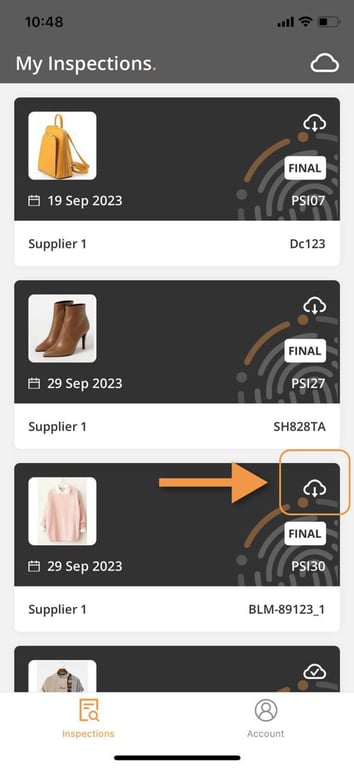
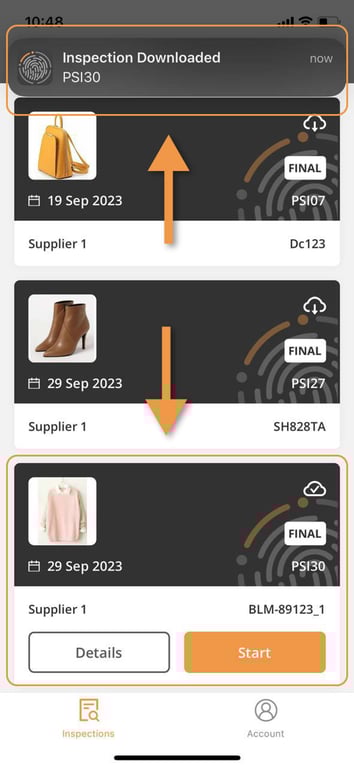
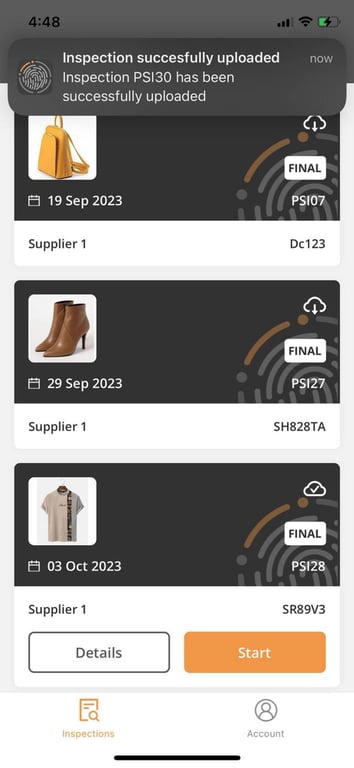
Download Inspection
Click here on the cloud symbol to download the inspection
After finishing the download, a notification will appear at the top. The buttons “Details” and “Start” appear. You are ready to start your inspection.
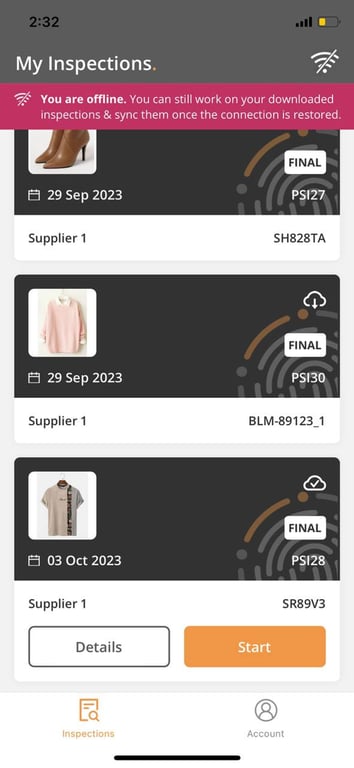
Offline Mode
After you download your inspection, you can already do your inspection without requiring any internet connection.
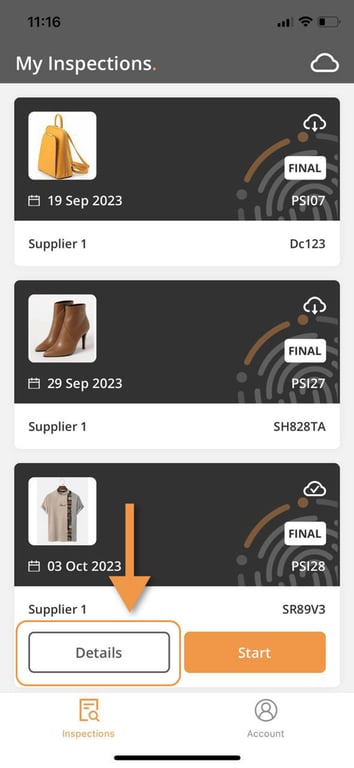
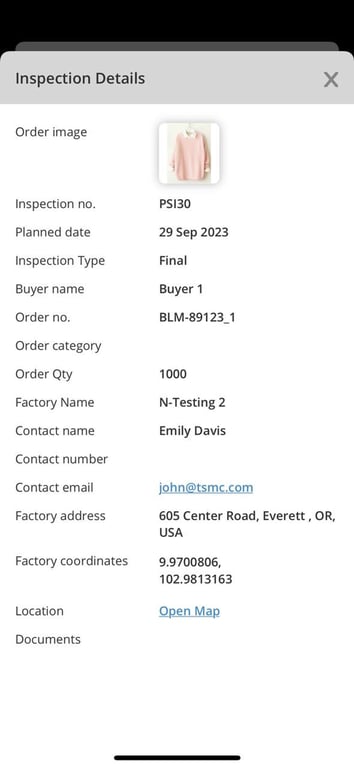
View Details
Click on “Details” button to view the detail information related to your inspection.
Here you can access various details inspector needs to know before going tot he factory.
Conduct your inspection
🎬 Video Tour How to Conduct an Inspection
Start Inspection
Fill in Actual quantity
Custom Section
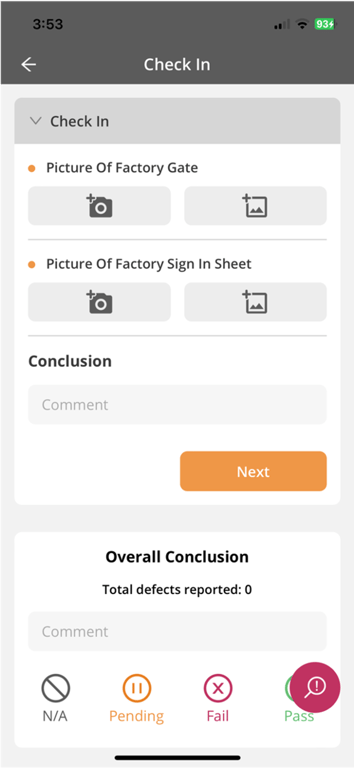
Check in
Product Conformity
Measurement section
Workmanship section
Submit Inspection
Edit Photo
📝 Step by Step guide of INFORMATION Tab
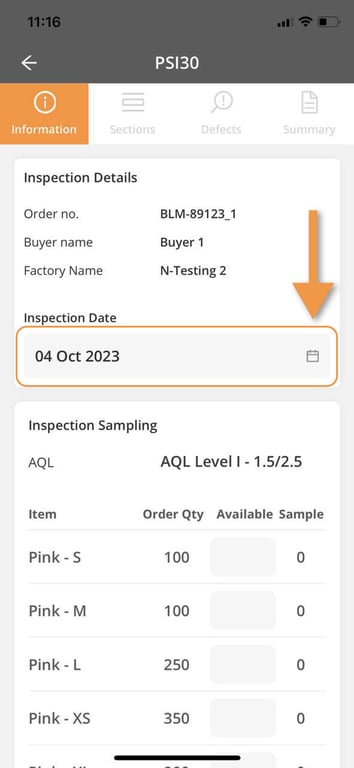
You can start your inspection by clicking on the START button.
Inspection Date
In this information page, inspector needs to update the actual date of the inspection.
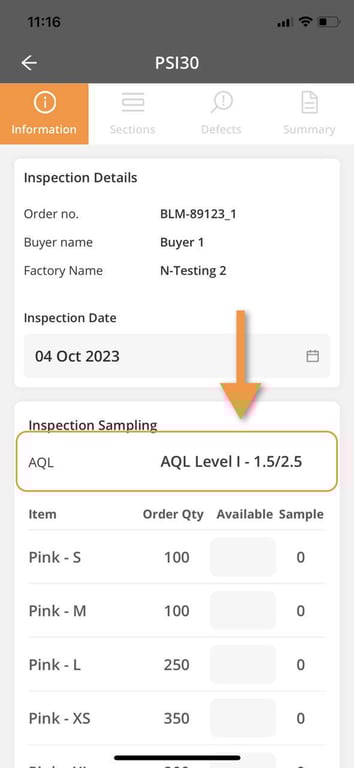
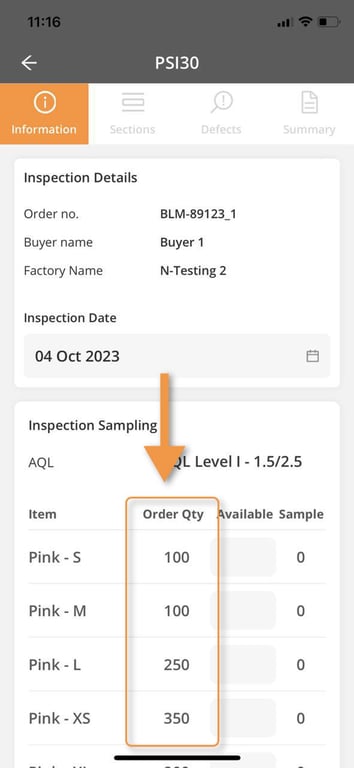
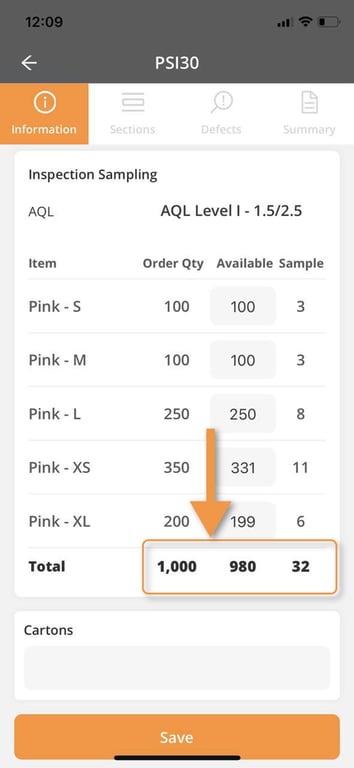
Inspection Sampling
- AQL Level
This is set by the admin in the order requirement tab or during the inspection creation. You cannot make changes in the mobile app.
- Item
This column lists down all various items to be inspected (It can be items defined by combination of color and size, destination, or as one total quantity of the order)
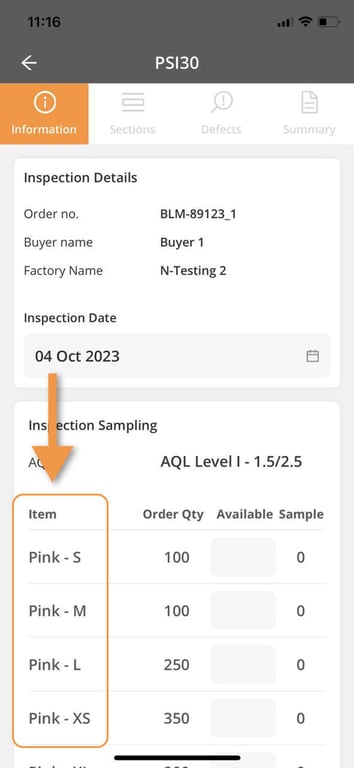
- Order QTY (Order Quantity)
This shows you how many units of this product need to be completed by the Factory
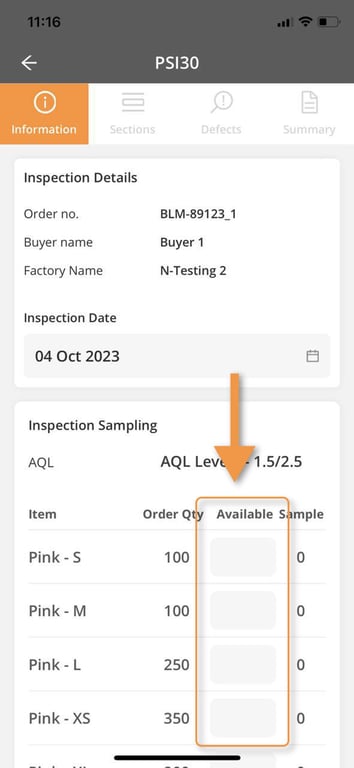
- Available
This column is where you need to add the actual full amount of the product that you see when you arrive at the factory.
- Sample
The sample is the automation calculated based on the available qty and AQL. It will tell you how many samples you need to do an inspection for each product.
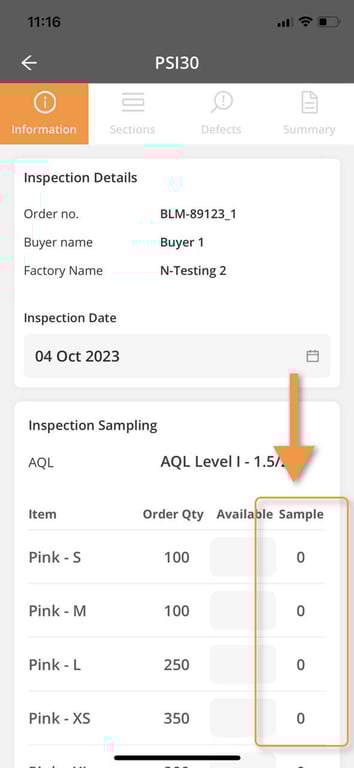
Let's start with adding the actual amount. So, the Sample will auto-generate when you fill in the Available number.
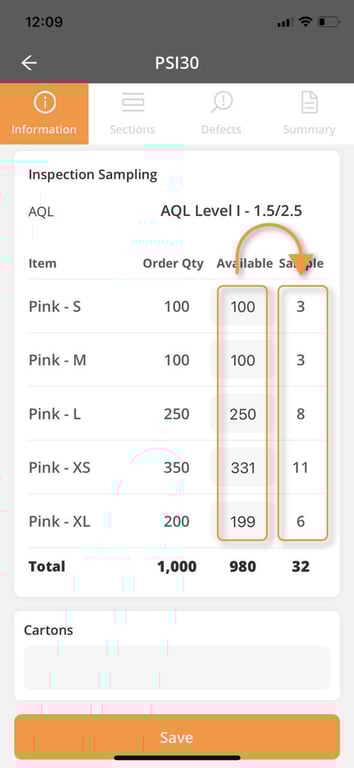
All the result total numbers are auto-calculated.
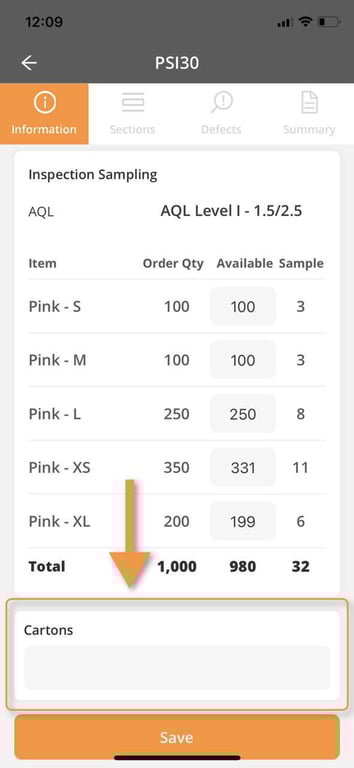
Cartons
The “Cartons” field is where you can fill in carton numbers to be pulled for inspection.
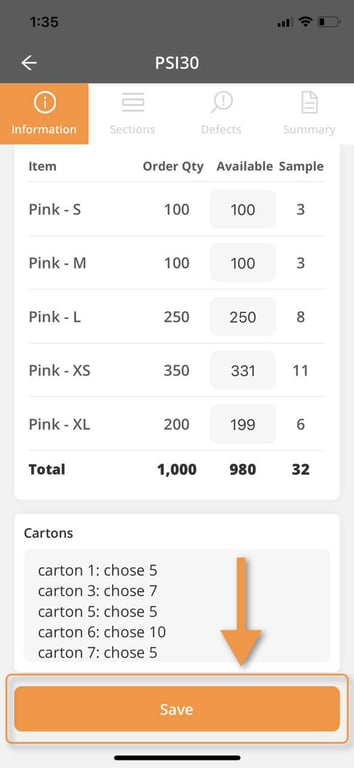
Save
After you fill in the Cartons field, Click on Save.
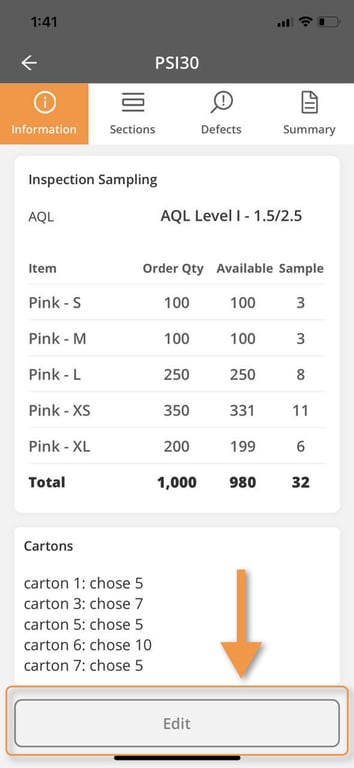
You can still edit your information later on by clicking on the “Edit” button.
📝 Step by Step guide of SECTIONS Tab
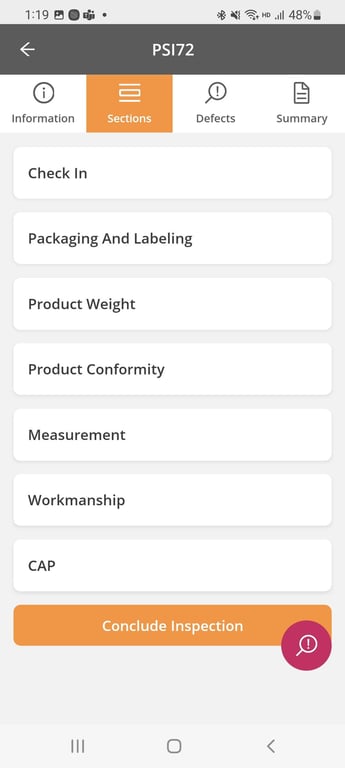
Sections and Sub-sections
The Sections tab gives inspectors access to their Checklist (Inspection template). Inspectors can tap on each step of the checklist to be taken to the various checkpoints they need to fill in. Inside each section, you can have multiple sub-sections (And inside sub-sections you will find your checkpoints)
For Example, in the example below, tap first on the SECTION Packaging and Labeling, then it opens the SUB-SECTION list
Sections
Sub-sections (Inside of the Packaging And Labeling section)
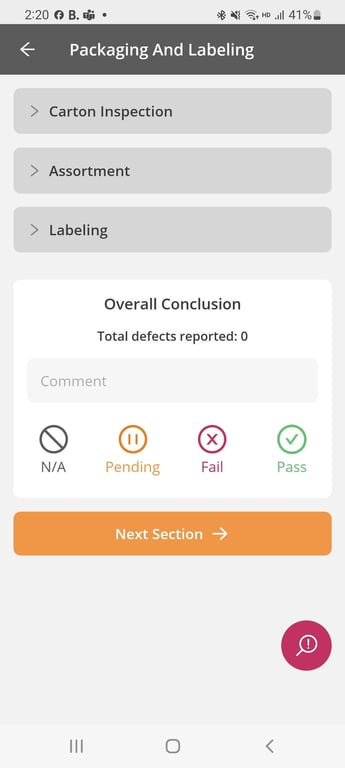
Checkpoints
Inside of each item of the checklist you will find a list of checkpoints inspectors needs to fill in. Each checkpoint could require inspector to write a comment, take a picture, select a date. Each of these actions is called a CONTROL TYPE.
Discover below the CONTROL TYPES available in Fingertip:
Control Type TEXT
Text: For free text field which allows inspector to input any kind of text.
Control Type NUMBER
Number: for simple number input which only allows the user to input a number.
Control Type PHOTO
Allows inspector to take a photo from the phone or tablet camera, or select a photo from the device gallery.
Control Type DATE
Allows the inspector to select a date from our calendar tool.

Control Type SINGLE CHOICE SELECTION
Requires inspector to select 1 answer out of a predefined option list (Defined in your inspection template / Checklist)
Option 1: Buttons
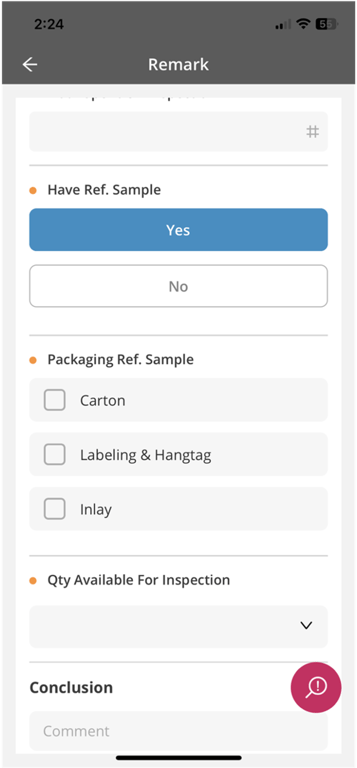
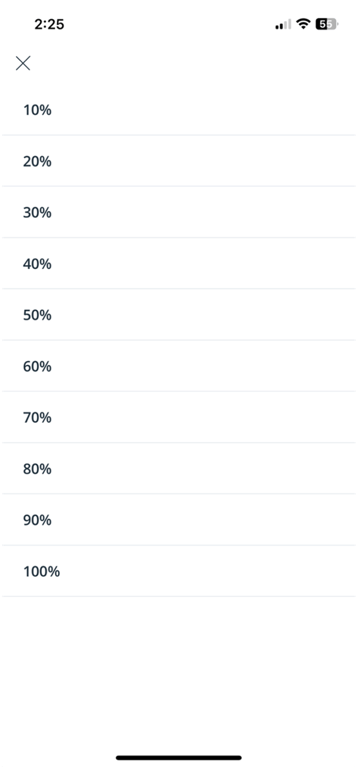
Option 2: Dropdown list
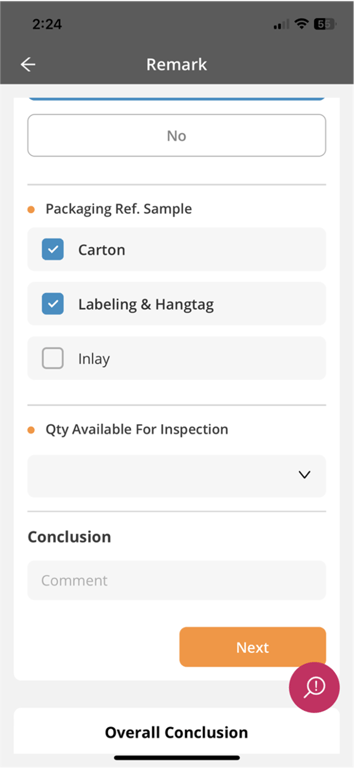
Control Type MULTIPLE CHOICE SELECTION
Allows inspector to choose several answer at the same time out of a predefined list (Defined in your inspection template / Checklist)
Control Type EDITABLE CHOICE SELECTION
Allows inspector to choose several answer and edit answer at the same time out of a predefined list (Defined in your inspection template / Checklist)
📝 Step by Step guide of DEFECT REPORTING
There are 2 ways to report on a defect:
- At any point during your inspection, tap on the red magnifying glass floating button at the bottom of the screen (Shortcut) to open the defect report form.

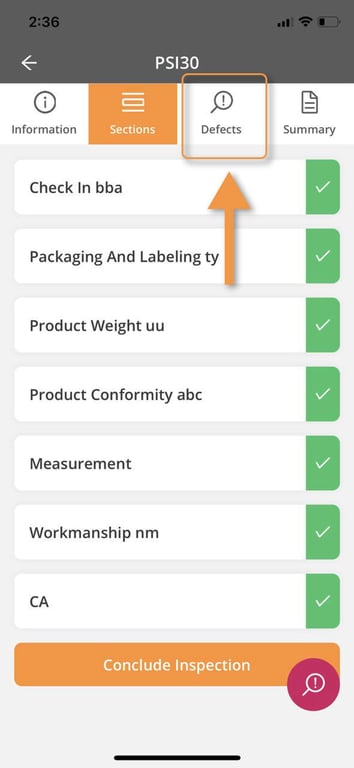
- Open the WORKMANSHIP SECTION of your checklist to access the report defect form.
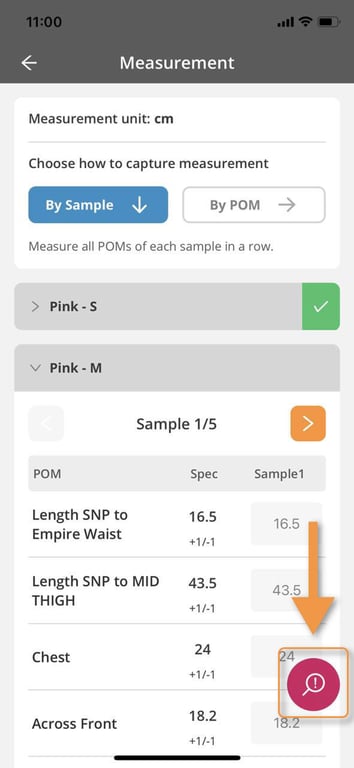
Defect Capture
At any moment of your inspection, tap on the red shortcut to report on a defect.
Tap on Defect Shortcut
For example: while you are doing measurement, and you see a defect. You can just click on this pink icon to add the defect.
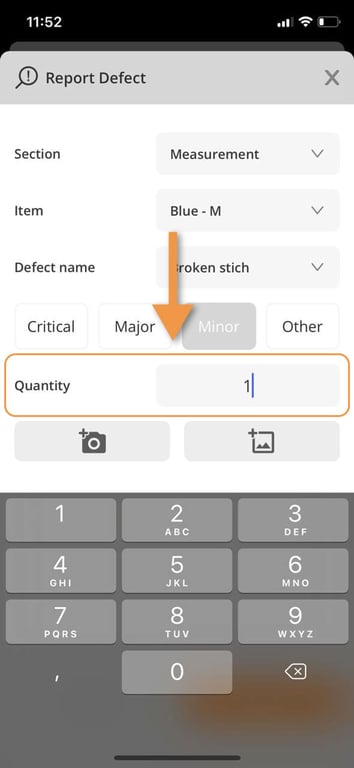
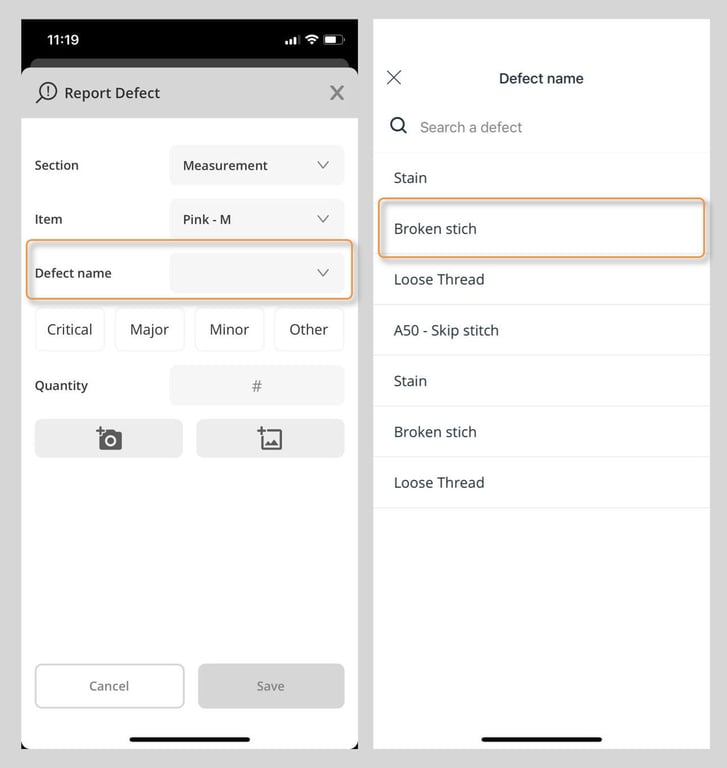
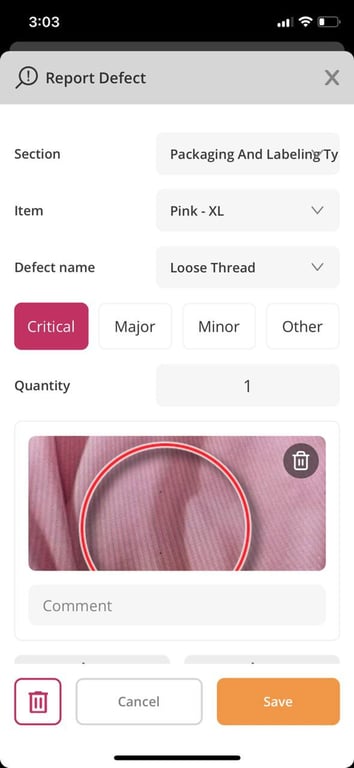
This will open the REPORT DEFECT Form
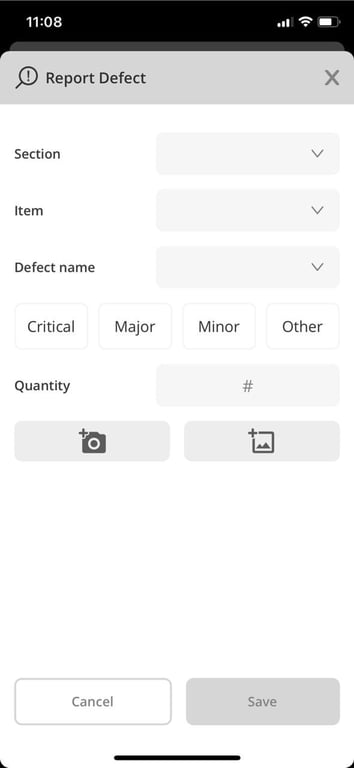
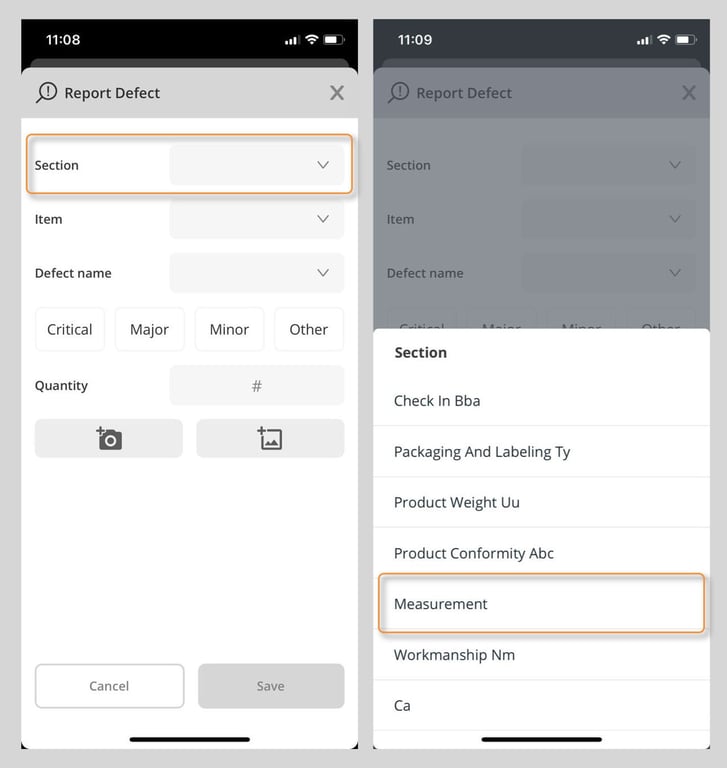
Defect Section
Click on the Section button to chose which section you wish to add a defect (This fully depend on your Checklist. You could choose to add a defect to your Conformity Section, Workmanship Section, Measurement Section, etc…).
In this example below we chose to add a defect to our measurement section.
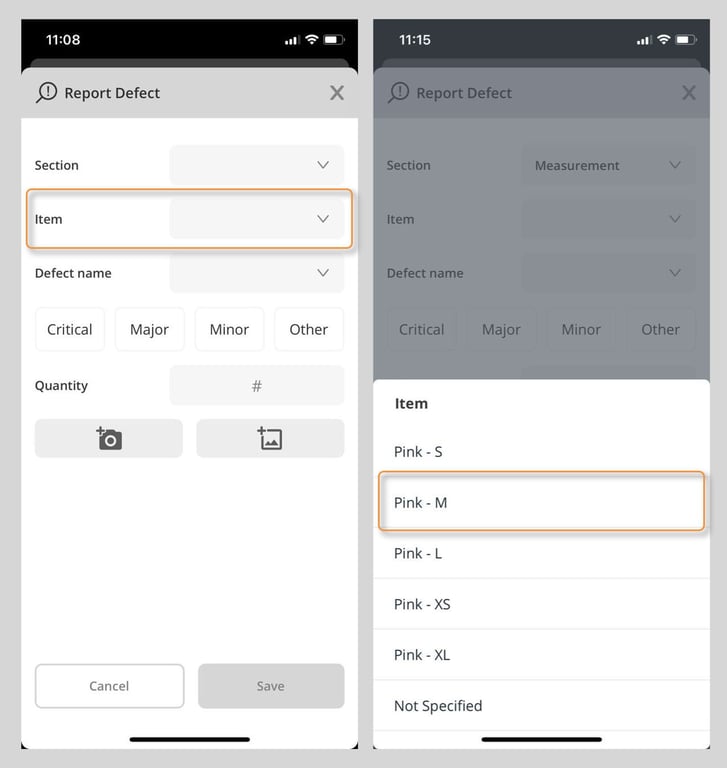
Item
Click on the Item field to choose the item to which you want to add a defect. In this example we chose to add a defect to the Item Color: Pink, Size: M.
Defect name
Click on this field to access your defect list and select the right defect. You can scroll down the list to locate your defect, or search it by name or defect code to locate it quickly.
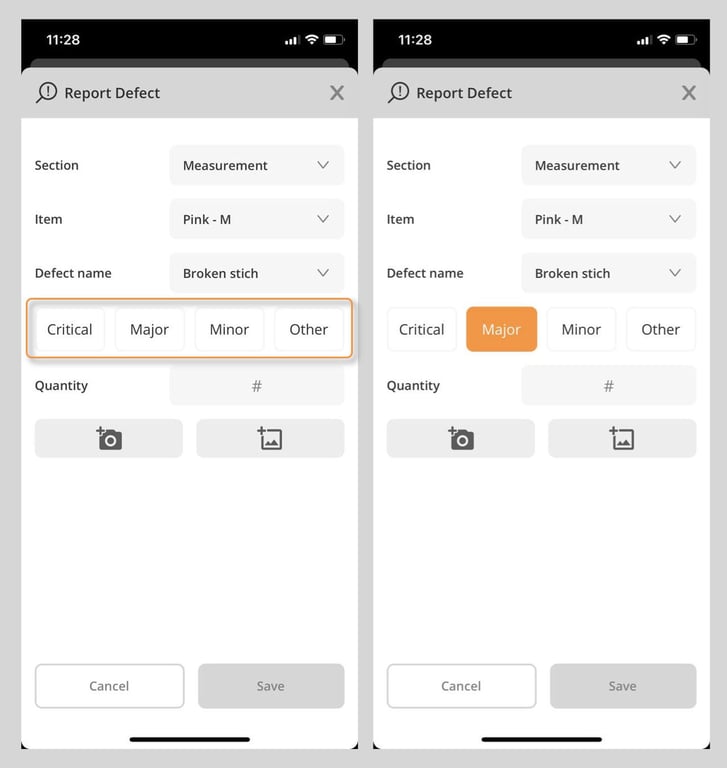
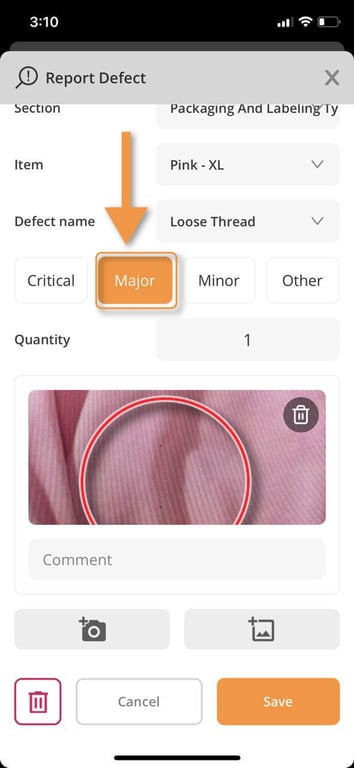
Defect Level
Every time you choose a defect, assign it a certain level: Critical, Major, Minor, or Other.
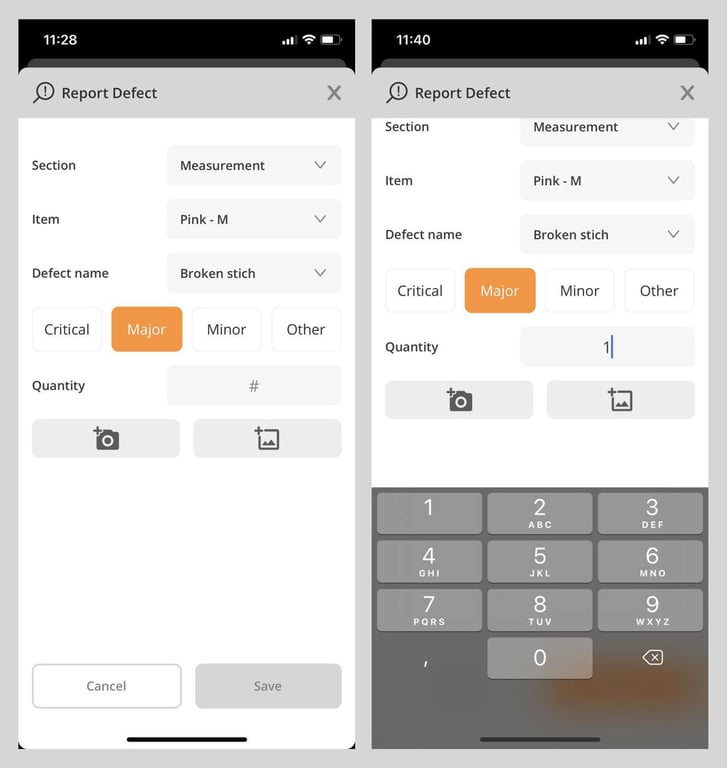
Quantity
Every time you add a defect, you need to report on how many times you found that same defect
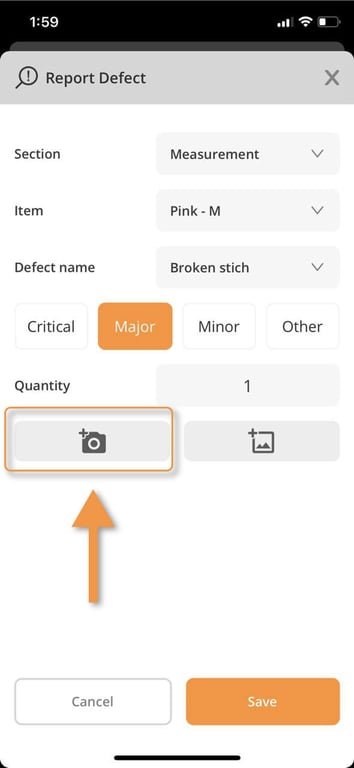
Photo
Every time you create a defect in your inspection it’s important to add a photo that will be linked to it and added to your report for a more comprehensive reporting.
There are 2 ways to add a photo. You can take a photo on the spot through your device’s camera, or directly access your device photo library to add a photo you had taken previously.
Defect Photo Capture & Edition
Step 1: Take a photo
Click on the camera icon
If you are satisfied with your photo, tap on USE PHOTO button. Otherwise click on RETAKE button.

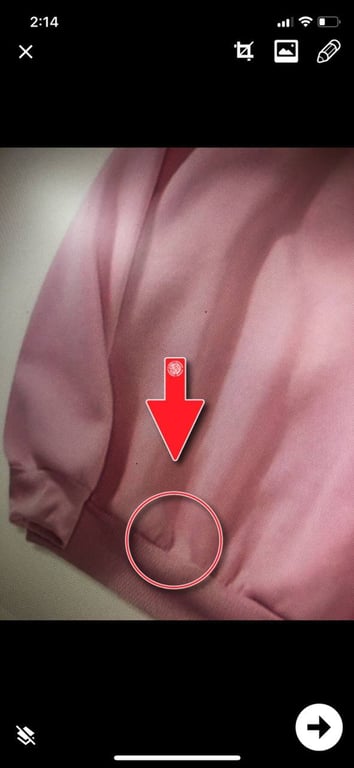
Step 2: Edit your photo (This is not mandatory)
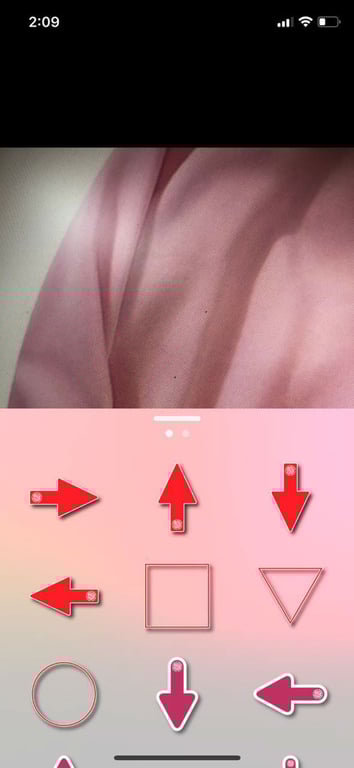
With stickers: Click on the image Icon to access our stickers library you can add on top of your image.
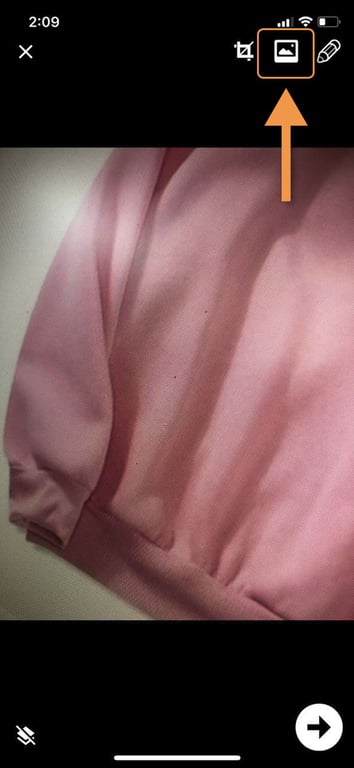
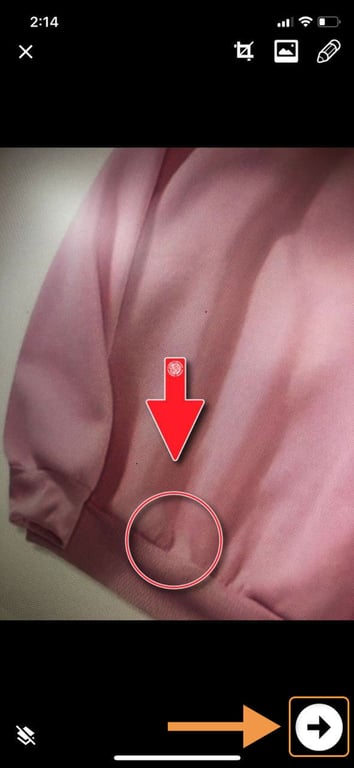
Then click on the arrow button to confirm your edits
Defect Summary Tab
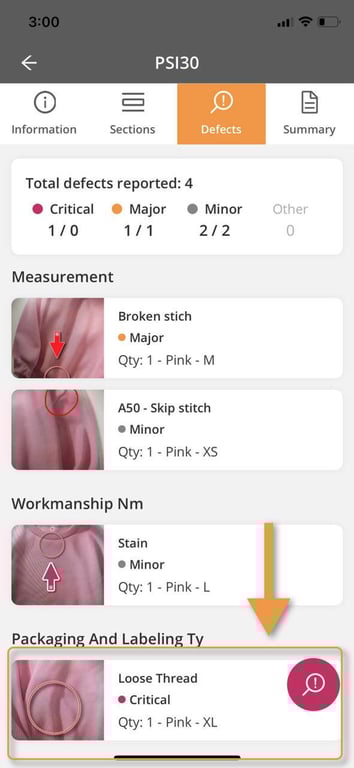
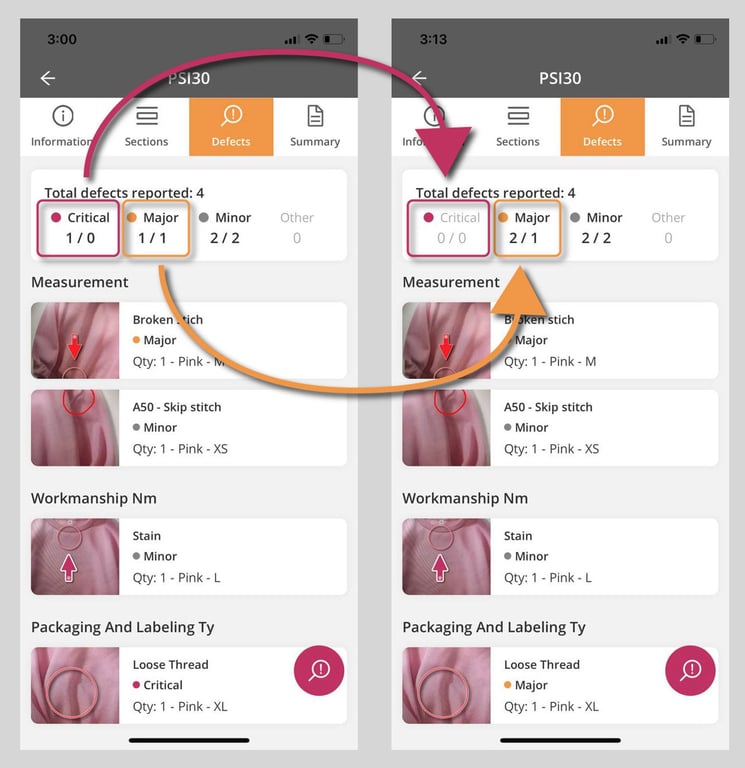
At any moment you can check all the defects you found by tapping, or swiping to the Defects tab.
All defects are located there, allowing you to review and edit them if needed. To edit an existing defect, just tap on it and update any info you want, including the photo itself.
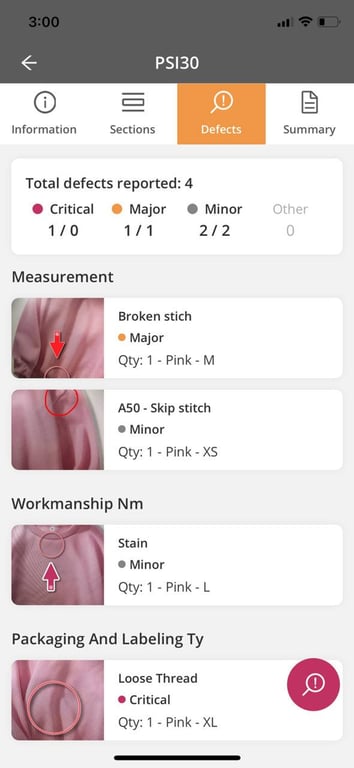
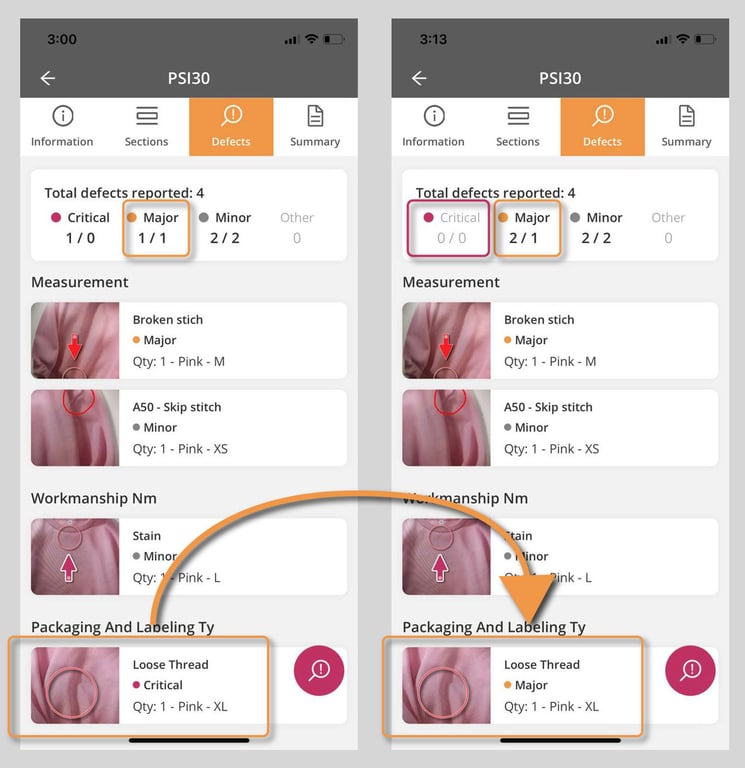
The total defect update from 1 critical to zero critical. And 1 major to 2 majors.
📝 Step by Step guide of SUBMIT REPORT
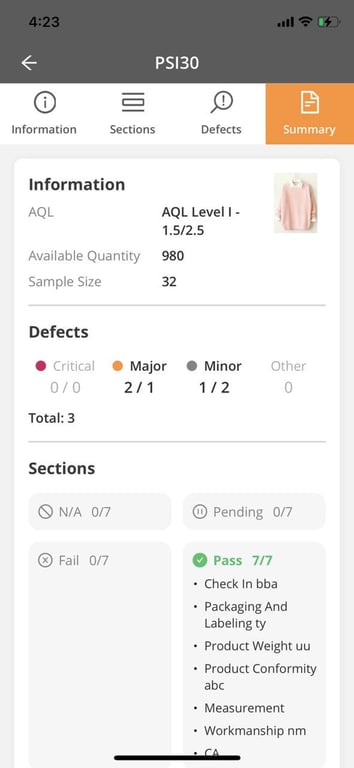
Summary Tab
Summary is the last part of the inspection. This Tab allows you to review all your inspection highlights before submitting it.
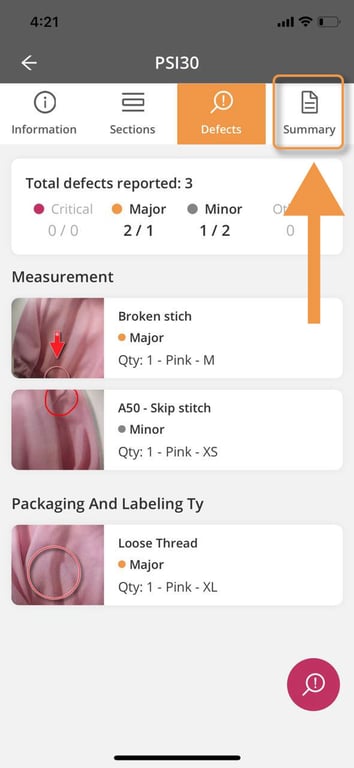
You access General Information reminder, Defects Tracker, Sections status.
Scroll down to give comments and put the overall result for your inspection.
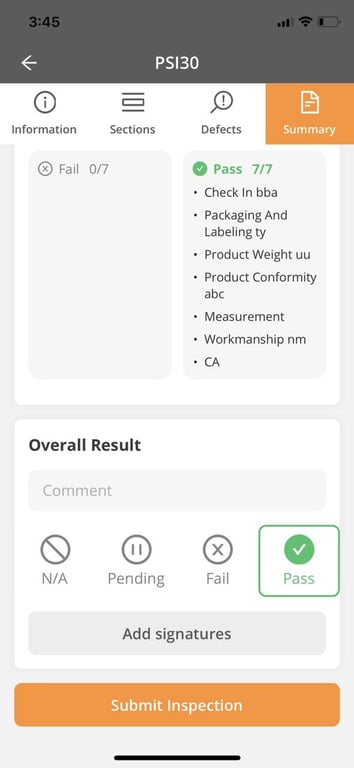
Click on ADD SIGNATURES button to sign.
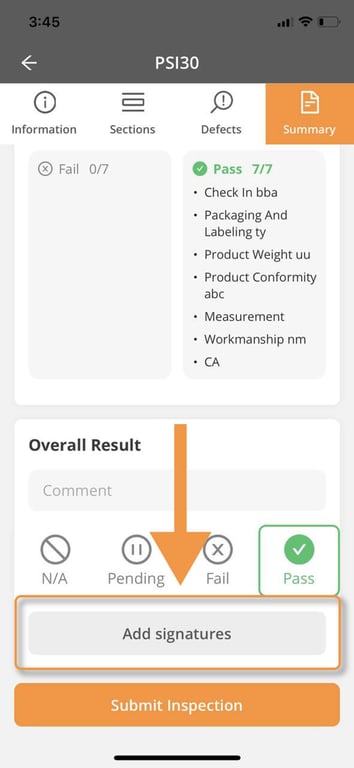

Click on Submit Inspection to finish and send the report.
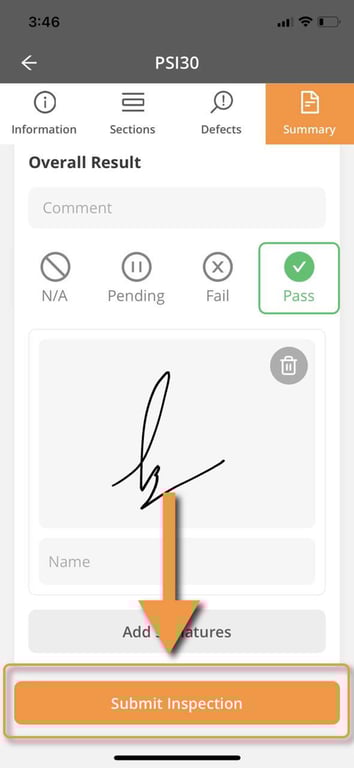
Once you submit the inspection, make sure your device is connected to internet as your inspection is being uploaded back to your organization cloud. Once this step completed, you’ll see a notification alerting you of a successful upload.
Uploading Issue
It could happen that your inspection doesn’t upload. Reasons could be that your internet connection is unstable, among other possible reasons.
In this case, you will get a red cloud icon on your inspection assignment. If that’s the case, make sure you get a better internet connection and tap on the red cloud to start a new upload.
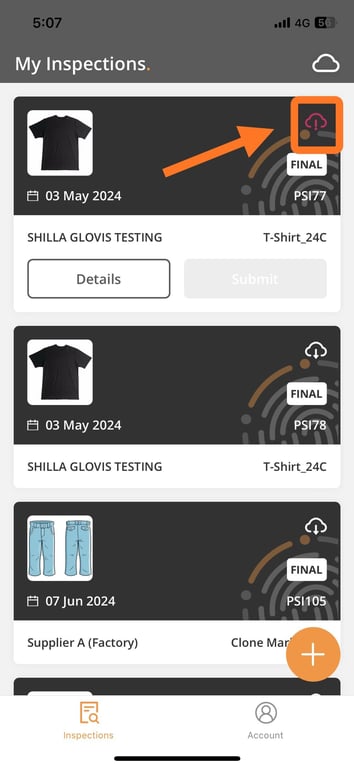
If issue persists, contact our support at support@getfingertip.io.
IntroductionBefore you start your inspectionStart the Mobile AppDownload InspectionOffline ModeView DetailsConduct your inspection🎬 Video Tour How to Conduct an Inspection📝 Step by Step guide of INFORMATION TabInspection DateInspection SamplingCartonsSave📝 Step by Step guide of SECTIONS TabSections and Sub-sectionsCheckpoints 📝 Step by Step guide of DEFECT REPORTINGDefect CaptureDefect Photo Capture & EditionDefect Summary Tab📝 Step by Step guide of SUBMIT REPORTSummary TabUploading Issue
 Made with Bullet